


Event tickets are more than just entry passes—they represent your event’s identity and leave a lasting impression on attendees. Whether you’re organizing a concert, wedding, seminar, sports event, fundraiser, or birthday party, a professionally designed ticket can enhance the overall experience. How to Make Professional Event Tickets Using PixelLab
The good news is that you don’t need expensive design software to create impressive tickets. PixelLab is a powerful mobile app that lets you design professional-looking event tickets using your smartphone. With its easy-to-use tools, customizable text, shapes, gradients, and image support, PixelLab is an excellent choice for beginners and experienced designers alike.
In this guide, you’ll learn how to make professional event tickets using PixelLab, from setting up your canvas to exporting a high-quality design.
Why Use PixelLab for Ticket Design?
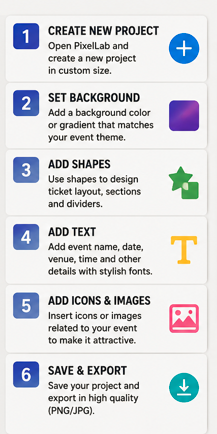
PixelLab has become popular because it combines powerful design features with a simple interface. Some of its advantages include:
- Easy to use, even for beginners
- Supports custom fonts
- Add logos, images, and QR codes
- Create shapes, borders, and gradients
- High-resolution export options
- Lightweight app that works on most Android devices
These features make PixelLab a practical tool for creating professional event tickets without needing a computer.
Step 1: Plan Your Ticket Design
Before opening PixelLab, decide what information your ticket should include. A standard event ticket typically contains:
- Event name
- Date and time
- Venue or location
- Ticket number
- Seat or section (if applicable)
- Organizer name
- QR code or barcode
- Terms and conditions
- Contact information
- Event logo or sponsor logos
Having this information ready makes the design process much smoother.
Step 2: Create a New Project
Open PixelLab and create a new canvas.
Choose a custom canvas size that matches your printing requirements. A common ticket size is:
- 1000 × 400 pixels
- 1200 × 500 pixels
- 1500 × 600 pixels
Using a larger canvas produces better print quality.
Step 3: Choose an Attractive Background
Your background should match the theme of your event.
Examples include:
- Dark colors for concerts
- Elegant gold and white for weddings
- Bright colors for festivals
- Corporate blue for seminars
- Black and red for sports events
You can use:
- Solid colors
- Gradient backgrounds
- Textures
- Background images
Avoid backgrounds that make the text difficult to read.
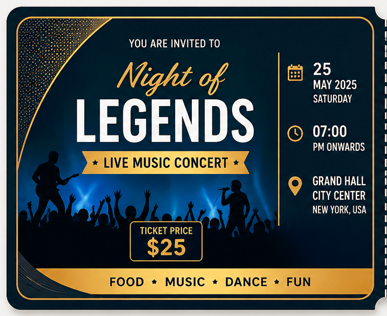
Step 4: Add the Event Title
The event title should be the largest text element on the ticket.
Choose a bold font and position it near the top of the design. Make sure it stands out from the background using contrasting colors.
Examples:
- Summer Music Festival
- Charity Dinner 2026
- Tech Innovation Conference
- VIP Concert Pass
Step 5: Insert Event Details
Below the title, add important information such as:
- Date
- Time
- Venue
- Organizer
- Entry gate
- Dress code (if applicable)
Keep the layout clean and aligned. Use smaller font sizes for supporting information while maintaining readability.
Step 6: Add Shapes and Design Elements
PixelLab includes useful shape tools that help make tickets look professional.
Use:
- Rectangles
- Rounded boxes
- Lines
- Circles
- Borders
These elements help separate different sections, such as:
- Event information
- Ticket number
- QR code
- VIP area
- Seating information
Maintain consistent spacing throughout the design.
Step 7: Include Your Logo
If you’re designing tickets for a company or organization, add the official logo.
Place it in one of the following locations:
- Top-left corner
- Top-right corner
- Center above the event title
Use a transparent PNG logo for the best appearance.
Step 8: Add a QR Code or Barcode
Modern event tickets often include a QR code or barcode for quick verification.
Generate a QR code using an online QR code generator, then import it into PixelLab.
Position it neatly in a corner or a dedicated section without covering important information.
Step 9: Add Ticket Number and Seat Details
Every ticket should have a unique identification number.
Examples:
- Ticket No: 000145
- VIP-203
- Seat A-12
- Row C
Highlight these details using bold text or colored boxes.

Step 10: Use Professional Fonts
Typography plays a major role in ticket design.
A good combination is:
- Bold font for the event title
- Clean sans-serif font for details
- Medium-weight font for ticket numbers
Avoid using too many different fonts. Two font styles are usually enough for a polished look.
Step 11: Apply Shadows and Effects Carefully
PixelLab offers various text effects, including:
- Shadow
- Stroke
- Emboss
- Glow
- 3D text
Use these effects sparingly. Too many visual effects can make the ticket look cluttered and less professional.
Step 12: Review the Layout
Before exporting your design, carefully check:
- Spelling errors
- Date and time accuracy
- Contact information
- Alignment
- Font consistency
- Color balance
- Image quality
A final review helps prevent costly printing mistakes.
Step 13: Export in High Quality
Once your design is complete:
- Tap the Export option.
- Select PNG format for the best image quality.
- Choose the highest available resolution.
- Save the file.
If you’re sending the design to a print shop, ensure the exported image meets their resolution requirements.
Tips for Creating Professional Event Tickets
To achieve the best results:
- Keep the design simple and uncluttered.
- Use high-quality logos and graphics.
- Maintain consistent spacing between elements.
- Choose colors that reflect the event theme.
- Ensure all text is readable.
- Leave enough margins for printing.
- Test print one copy before printing in bulk.
Common Mistakes to Avoid
Many beginners make these design mistakes:
- Using too many fonts
- Overcrowding the ticket with information
- Low-resolution images
- Poor color contrast
- Misaligned text
- Excessive visual effects
- Forgetting important event details
Avoiding these issues will make your ticket look much more professional.
Final Thoughts
Designing professional event tickets doesn’t require expensive software or advanced graphic design skills. With PixelLab, you can create stylish, high-quality tickets directly from your smartphone. By choosing a clean layout, using readable fonts, adding essential event details, and exporting your design in high resolution, you can produce tickets that look polished and ready for print.
Whether you’re designing tickets for a wedding, concert, conference, sports event, or private party, PixelLab provides the tools you need to create attractive and professional results with ease.